4.1 More Sprites
right-click the Content\Images folder in Solution Explorer, select Add Existing Item, and then browse to the skullball.png image and add it to the solution
We need variables to draw and animate the skull ball sprite.
Texture2D skullTexture;
Point skullFrameSize = new Point(75, 75);
Point skullCurrentFrame = new Point(0, 0);
Point skullSheetSize = new Point(6, 8);
int skullTimeSinceLastFrame = 0;
const int skullMillisecondsPerFrame = 50;
Modify the rings variable to establish its properties by renaming:
Texture2D ringsTexture;
Point ringsFrameSize = new Point(75, 75);
Point ringsCurrentFrame = new Point(0, 0);
Point ringsSheetSize = new Point(6, 8);
int ringsTimeSinceLastFrame = 0;
int ringsMillisecondsPerFrame = 50;
Load your skull ball image into the skullTexture variable in the LoadContent method in the same way you loaded your three rings image in Ch3:
skullTexture = Content.LoadNext, add the code that will move the current frame through the sequence of frames on the sprite sheet in the Update method. Duplicate the code for moving through the sprite sheet frames, as done with three rings.(@"Images\skullball");
Then draw the sprite on the screen in the Draw method.
To ensure that the two sprites aren’t drawn on top of each other, change the second parameter of the skull ball’s Draw call to draw the image at (100, 100) rather than at (0, 0).
Compile and run to produce: Game1.cs
Recall from before, we use polling and not the more typical registering for events. In game development, there is no idle time, so it would take too much run-time (too expensive) to enable developers to register for events. Instead, it is up to you as the developer to constantly poll input devices asking whether the player has performed any actions on those devices.
Next we examine the Mouse, GamePad and KeyBoard as input devices to poll.
4.2 Keyboard Input
Keyboard has a static class called GetState to retrieve the current state of the keyboard in the KeyboardState structure.
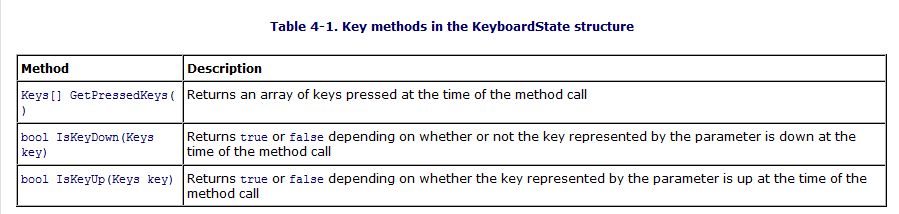 Table 4-1
To check the status of the "A" key:
if(Keyboard.GetState(  ).IsKeyDown(Keys.A))
    // BAM!!! A is pressed!
We want to move the three rings animated icon based on the status of game pad.
You will need to use a Vector2 variable to represent the current position at which to draw the three rings sprite. You’ll also want to add a variable to represent the speed at which the three rings sprite will move. Because the speed at which you move the three rings sprite won’t change during the course of the game, you can make that variable a constant. Add these class-level variables at the top of your class:
Vector2 ringsPosition = Vector2.Zero;
const float ringsSpeed = 6;
and the code at the end of the Update method.
KeyboardState keyboardState = Keyboard.GetState(  );
if (keyboardState.IsKeyDown(Keys.Left))
    ringsPosition.X -= ringsSpeed;
if (keyboardState.IsKeyDown(Keys.Right))
    ringsPosition.X += ringsSpeed;
if (keyboardState.IsKeyDown(Keys.Up))
    ringsPosition.Y -= ringsSpeed;
if (keyboardState.IsKeyDown(Keys.Down))
    ringsPosition.Y += ringsSpeed;
Wouldn't an if/elsestatement be more efficient than four if statements? Well, yes, it would. But an if/else statement would only allow you to move in one direction at a time, whereas using four separate if statements allows you to move diagonally as well (for example, combining the up and left key inputs).
Also note that instead of calling the GetState method of the Keyboard class in each if statement, you’re calling it only once and then reusing the result from that call. This is because the call to GetState is fairly expensive, and this approach reduces the number of times you have to make that call.

4.3 Mouse Input
void SetPosition(int x, int y).This method will—you guessed it—allow you to set the position of the mouse. This position is relative to the upper-left corner of the game window.
 Table 4-2
By default the mouse cursor is hidden when the mouse is
dragged over an XNA game window. If you want to display the cursor in an XNA
window, you can do so by setting the IsMouseVisible property of the Game class to true.
Table 4-2
By default the mouse cursor is hidden when the mouse is
dragged over an XNA game window. If you want to display the cursor in an XNA
window, you can do so by setting the IsMouseVisible property of the Game class to true.
In order to determine whether the mouse has moved, add a class-level MouseState variable at the top of your class:
MouseState prevMouseState;
This variable will keep track of the mouse state from the previous frame. You will use it to compare the previous state to the current state of the mouse in each frame. If the values of the X and/or Y properties are different, you know the player has moved the mouse and you can move the three rings sprite to the new mouse position.
Add the following code to the end of your Update method, just before the call to base.Update:
MouseState mouseState = Mouse.GetState(  );
if(mouseState. X != prevMouseState.X ||
    mouseState. Y != prevMouseState.Y)
    ringsPosition = new Vector2(mouseState.X, mouseState.Y);
prevMouseState = mouseState;
This code will move the three rings sprite to the position of the mouse, but only if the mouse has been moved. If you compile and run at this point, you should see that you are now able to control the rings sprite with the mouse or the keyboard.
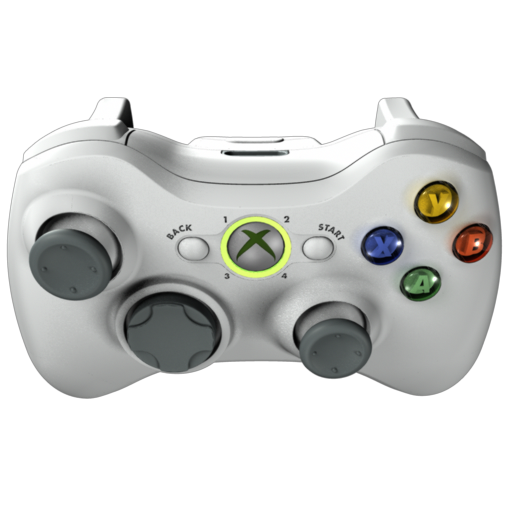
4.4 Gamepad Input
The wireless Xbox 360 controller actually does come with a wire if you buy the charge pack for that controller. However, there is no data transfer over that cable, so even when it’s plugged in, it’s still a wireless controller. The cable on the charge pack transfers electricity for the charge and nothing more.
I have been working with the "Play and Charge" controllers for the Xbox 360 and have them in the lab for usage. Let me know if they are working properly.
Since we do not have a GamePad in AH1112, we will skip this input device for now, but the systems in GMCS 408 all have game pads. I hope to remember to bring my Game Pad to lecture.
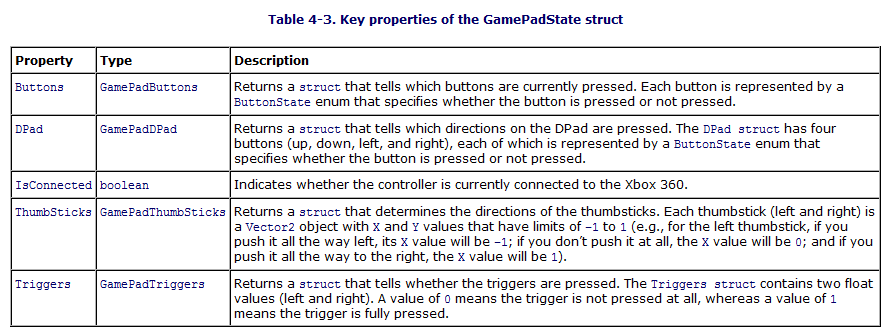 Fig4-3
 Table 4.4
4.5 Keeping the Sprite in the Game Window
You have probably noticed that the rings sprite will disappear off the edge of the screen if you move it far enough. It’s never a good idea to have the player controlling an object that is offscreen and unseen. To rectify this, update the position of the sprite at the end of the Update method. If the sprite has moved too far to the left or the right or too far up or down, correct its position to keep it in the game window. Add the following code at the end of the Update method, just before the call to base.Update:
if (ringsPosition.X < 0)
    ringsPosition.X = 0;
if (ringsPosition.Y < 0)
    ringsPosition.Y = 0;
if (ringsPosition.X > Window.ClientBounds.Width - ringsFrameSize.X)
    ringsPosition.X = Window.ClientBounds.Width - ringsFrameSize.X;
if (ringsPosition.Y > Window.ClientBounds.Height - ringsFrameSize.Y)
    ringsPosition.Y = Window.ClientBounds.Height - ringsFrameSize.Y;
4.6 Collision Detection

To implement the bounding-box algorithm in the current game, you’ll need to create a rectangle for each sprite based on the position of the sprite and the width and height of the frames for that sprite. The code will make more sense if you change the position of the skull ball sprite to a variable, as you’ve done with the rings sprite. Add the following class-level variable, which will be used to hold the position of the skull ball sprite. Also, initialize the variable to the value that you’re currently setting as the position of the sprite when you draw it, (100, 100)
Vector2 skullPosition = new Vector2(100, 100);
Add the following method to your Game1 class, which will create rectangles for each sprite using the XNA Framework Rectangle struct. The Rectangle struct has a method called Intersects that can be used to determine whether two rectangles intersect:
protected bool Collide(  )
{
    Rectangle ringsRect = new Rectangle((int)ringsPosition.X,
        (int)ringsPosition.Y, ringsFrameSize.X, ringsFrameSize.Y);
    Rectangle skullRect = new Rectangle((int)skullPosition.X,
        (int)skullPosition.Y, skullFrameSize.X, skullFrameSize.Y);
    return ringsRect.Intersects(skullRect);
}
Next, you need to use the new Collide method to determine whether the objects have collided. If so, you’ll want to perform some action. In this case, you’re just going to close down the game by calling the Exit method if the sprites collide. Obviously, this isn’t something you’d want to do in a real game, because just quitting the game when something like a collision occurs will seem like a bug to a player. But because we just want to see collision detection in action, this will work for now. Add the following code to the end of your Update method, just before the call to base.Update:
if (Collide(  ))
    Exit(  );
Compile and run the game. If you move your rings object too close to the ball, the application will shut down.
Why doies the application quit when the 3rings and the skull do not quite collide?
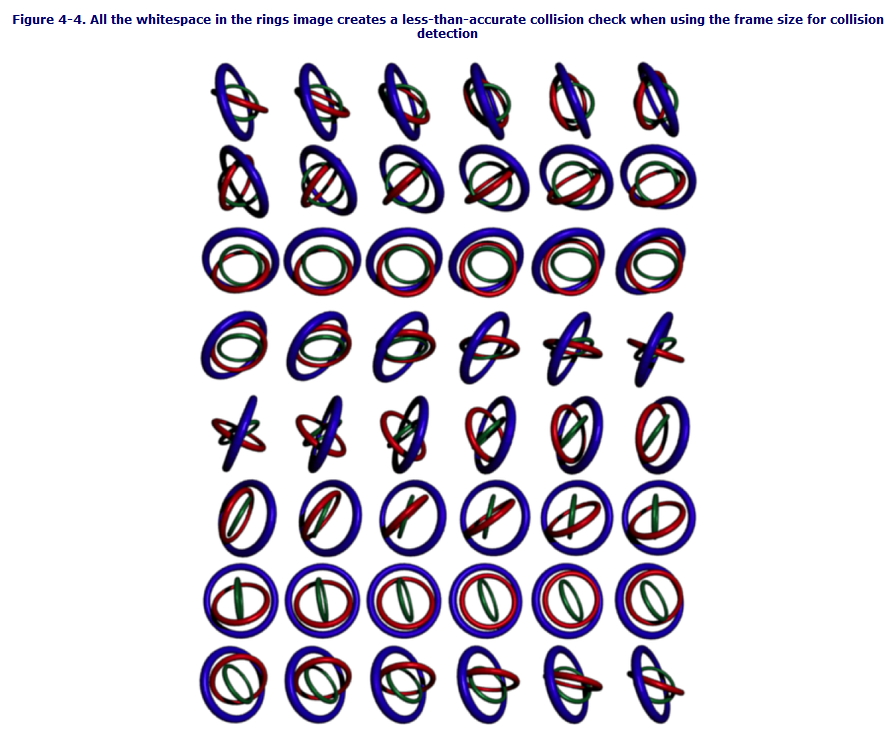
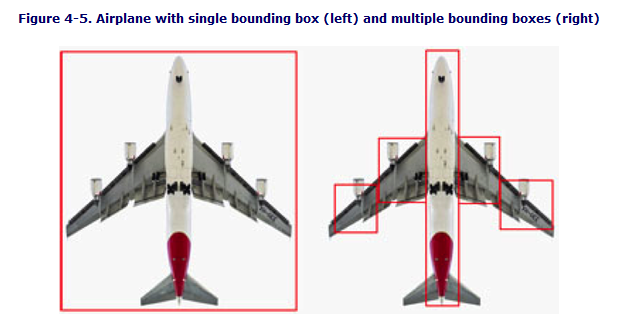 Fig4-5
What you did / Summary:
You implemented a sprite controlled by a user via a keyboard, a mouse, and an Xbox 360 gamepad.
You implemented force feedback using the Xbox 360 controller.
You implemented collision detection for two animated sprites.
You learned about the balance between accuracy and performance in collision detection.
Summary:
Input devices supported in XNA include the keyboard, mouse, and Xbox 360 controller.
The Xbox 360 has several analog inputs that allow for varying degrees of input from a single button.
Collision detection is a constant balance between performance and accuracy. The more accurate an algorithm is, the more of a performance hit is usually incurred.
The bounding-box algorithm for collision detection is one of the simplest and most straightforward algorithms. If you “draw” an imaginary box around each object, you can easily tell which box is colliding with another box.
You can speed up collision detection while improving accuracy by combining methods. Use a large box to determine whether it’s worth the time to check the smaller boxes surrounding sections of an object, or implement a grid-based system to avoid unnecessary collision checks between objects that are not close together.
Do you notice anything that tyrannical dictators, drug lords, and gangbangers have in common? That’s right, typically they don’t use XNA. That’s proof right there that XNA spreads world peace. Make XNA, not war.