MSDN Creaters Club 3D Primitives sample - great motivation for Chapter 10 - 3D Models - Cube Sphere Cylinder Torus Teapot
Aaron Reed: Learning XNA 4:
Today's graphics cards and processors deliver amazing level of details.
The effort you put in to understanding your own computer system capabilities, especially the GPU, will be worth it, but beyond the spoke of this source.
XNA treats 2D and 3D graphics differently, so we will create a new project from scratch for this Chapter.
Open Visual Studio and select
Key Features in Going from 2D to 3D: 1) Coordinates (we have a Z direction)
Programming 2D games in XNA is very similar to painting a picture on a canvas: you're drawing in two-dimensional space; the coordinate (0, 0) sits at the top-left corner of the screen; and X moves positively to the right, while Y moves positively downward.
If drawing in 2D is like painting a picture, drawing in 3D is like recording a video with a handheld camera. Recall from Chapter 3, the (0,0) in the X, Y screen coordinates is the upper left corner.

Coordinates in 3D are based on a three-dimensional coordinate system. This coordinate system, sometimes referred to as world space, centers around an origin at the coordinate (0, 0, 0). However, unlike when drawing in 2D, when drawing something at the origin in 3D, you can't guarantee that that object will be viewed at the center of the screen, the top-left corner, or anywhere at all. Why is that? Because in 3D, there are two basic components to drawing a scene: placing objects in the world, and placing a camera in the world and specifying a direction in which that camera will point. Only objects that the camera sees will be visible on the screen.
2D graphics is like drawing a picture. 3D graphics is like recording a movie with a hand-held video camera, that can spin on its 3 axes.
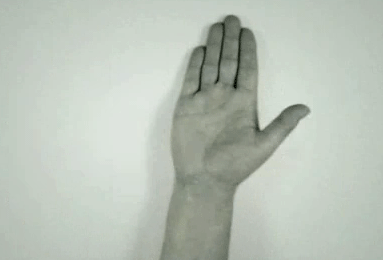
The X-Axis and Y-Axis are what we have used for 2D graphics, labelling horizontal and vertical. X increases going to the right, Y increased going upward. What handling the 3rd dimension of depth is new. We have 2 different 3D coordinate systems, differing on the orientation of the Z-Axis. Hold your palms up, fingers point in positive X directive. Curl finger up to show positive Y direction. Thumb now give positive Z direction.
 Left-handed and Right-handed
XNA uses a right-handed coordinate system, which means that when you're looking at the origin from a traditional angle where X moves positively to the right and Y moves positively upward, Z moves positively toward you.
The "recording a movie" properties of drawing a scene in 3D are stored in a Matrix object. When you study Linear Algebra with coordinates in Math 254 you work with matrices. This is required for all CS majors.
For students who are non-CS majors, where do you encounter these concepts? for 3D art?
There are two Matrix objects that make up a camera in XNA: the view and projection matrices. The view matrix holds information that determines where the camera sits in the world, what direction it's pointing in, and what its orientation is. The projection matrix holds information that determines properties of the camera based on the angle of the view, how far the camera can see, and so forth. This matrix represents the transformation from the 3D world to the 2D plane of the screen.

Look at the Data Type. For 2D development, we used Vector2 to represent (X,Y) coordinates. For 3D, we use Vector3 to represent (X,Y,Z).
Not only do you specify the position of the camera in 3D, you also specify the direction the camera points (cameraTarget) and the orientation of the camera (cameraUpVector). You might be tempted to take your hand-held video camera and roll it on its side, or even up-side-down.

The projection matrix builds what's called a viewing frustum or field of view for your camera. Essentially, it defines an area in 3D space that is viewable by the camera and will be drawn on the screen. Objects that exist within that area are drawn on the screen, unless they're obscured by other objects between them and the camera. Objects that are outside the viewing frustum are not drawn on the screen.

In Figure 9-3, you can see a drawing of a hypothetical viewing frustum or field of view. The three-dimensional box represents the area that will be drawn on the screen. Any object outside of this box will not be drawn, regardless of whether it is drawn in front of, behind, or to the side of the box. The nearPlaneDistance and farPlaneDistance parameters define the front and back of the box and are also referred to as the near clipping plane and the far clipping plane. Nothing in front of the near clipping plane will be drawn, and nothing behind the far clipping plane will be drawn.
Defining the Field of View
You need to be somewhat careful when choosing which values to use to represent your near and far planes. Most beginning XNA developers will choose a very small number (like 1) for the near plane and a very large number (like 10,000) for the far plane. Keep in mind that this means that everything within those planes (and within the other bounds of the field of view) will be drawn on the screen. If there's a lot going on in your game, you may encounter performance issues if your near and far planes are too far apart.
Ever notice in a land-based game that you're walking around in the wilderness, and all of a sudden a somewhat distant mountain just pops into view? This is because the mountain was previously behind the far plane, and as you moved toward it, it entered the field of view. If such games didn't have that functionality and instead always drew everything in the world, performance would crawl and the game would be unplayable. Make sure that you show enough of the world to make the game playable but exclude enough to avoid performance issues.
In my experience in teaching students how to develop in XNA, when a developer expects to see something drawn on the screen in 3D and the object doesn't appear, the problem has something to do with the field of view of the camera or the position and direction of the camera.
The most common mistakes I see in this area are that an object isn't drawn because the camera is pointing in the wrong direction, and that objects aren't visible on the screen because they are either in front of the near clipping plane or behind the far clipping plane.
When dealing with cameras, it often makes sense to create a game component for your camera. This makes it really easy to add cameras to new games (just add the component to the project, and then add it in code to the game) and to update the camera and move it around. Create a new game component in your 3D project by right-clicking the project name and selecting
Make sure that you cast the screen width and height to floating-point values when calculating the aspect ratio, as shown here. Not doing so will divide int by int, which can cause information loss and may make your graphics look squished.
The only tricky thing here is the use of the MathHelper.PiOver4 value to represent pi divided by 4. We talk a lot more about this later in this chapter, but for now, you just need to know that angles in XNA are measured in radians.

Camera.cs Our first code
Next, you need to add your camera component to the list of components in your Game1 class. Create a class-level Camera variable in your Game1 class:
Camera camera;
Then, in the Initialize method of the Game1 class, add the following code to instantiate the camera and add it to the list of Game1's components
Game1.cs
Compile the code and you get ...